PRODUCTION PRACTICE: MONTAGE/ TABLE TOP SEQUENCE
"A WHOLE WORLD IN A TABLE TOP"
Brief: to create a title sequence using only a table top and props with a small part of live action at the end of it , using a given soundtrack.
Research: In class we watched the title sequences of Delicatessen and To Kill as Mockingbird, which both use a table top-style title sequence, with camera shots that pass over a range of chosen props to infer a narrative.
I worked with Fia, Tallulah and Millie to create our table top sequence, that was based from the perspective of a woman who becomes jealous and angry when she finds out the man she is in love with has another lover (Heather) and has plans of proposing to her.
In our session 1, we worked on a black leather sofa, which we covered with white lace, to match with the rest of the mise-en-scene that had an old, Parisian feel. We arranged our chosen objects (a picture of a man, his letter and rose for Heather, a picture of Heather and finally, a jewellery box containing an engagement ring), in a specific layout to make the narrative clear.
With a steady hand, we glided the camera above the props, following Tallulah's (the woman's) hand as she discovered the objects. We thought that the live action POV shot of the hand helped to add perspective to the sequence as it gave an insight as to her trails of thought as she discovered the props. For example the aggressive motion of her hand slamming the picture down illustrated her hurt and anger towards 'Heather'.


In session 2, we added in live-action to make our narrative more intriguing for an audience, creating a larger influence to keep watching. We filmed in a different location (the mansion steps) to ensure that a viewer would maintain interest and want to continue watching.
Our chosen soundtrack was 'Heather' by Colan Gray, which we thought would tie in well with our sequence as one of the key lyrics in the song is 'I wish I were Heather', which we timed to play out as the camera angle was a birds eye view of the letter, addressed to 'Heather'. This made the woman's feelings and emotions clear, providing an insight into her character.
Finally, we uploaded our footage to iMovie to incorporate the soundtrack and make edits, such as adding in the titles. One major edit we made was to change the colour scheme to monochrome, as we thought that would match our aesthetic and was representative of the time we wanted it to be set in: the early 1900s. We also made the tracking shot of Tallulah running slow-motion, which fitted with the non-diegetic music slowing down.


CONTINUITY EXERCISE
Brief account of the making of our continuity exercise and how we overcame any problems we faced:
The aim of the exercise was to put into practice our understanding of different camera angles and shot types and to experiment with continuity editing to create a short clip. We worked in small groups, allowing us all to have a chance to experiment with shots that we might want to use in our final opening sequence, such as two-shots, over the shoulder shots and shot-reverse shots.
We chose to make our continuity exercise a horror/thriller, which are two genres that I hope to further explore in the future for my final film opening sequence. In our narrative, we had Millie play a possessed school girl, with me being the figure that was possessing her. Tallulah and Fia played Millie's two friends who witnessed her being possessed and tried to stop it.
Our first step was to create a story board, ensuring that we fully understood the shots we were planning to include and the series of events our piece would have. We filmed and edited our continuity exercise on iMovie on our phones.
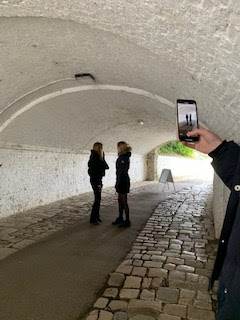


One problem we encountered was ambient noise, from the other groups working as well as the wind outside. In order for this sound to not interfere with our filming we moved to the tunnel, where we were sheltered from the weather and away from any background noise from other people. We also found that working in the tunnel worked in our favour in terms of our narrative as the slightly dark and eerie surroundings contributed to the establishment of our horror genre through creating a more sinister atmosphere.

ON THE SET
Brief account of learning how to handle a camera, terminology to use on set and a good practice in editing

In today's lesson (Thursday 17th September) we explored the process behind setting up the camera and tripod, and how to use them. We used Canon cameras and Manfrotto tripods.

Camera and Tripods: In groups of 3 or 4, we passed one camera around, and set the tripod up in the middle.We made sure that we each had an opportunity to practice handling the camera, and to inset the battery and memorycard. We then gently
slotted in the camera into the tripod and tightened it, to make sure it was secure.
It was important that we ensured that the bubble was centred meaning that the camera was balanced and level. We then had a chance to explore the camera, learning how to focus, zoom in and adjust exposure. We were told the terms to use when handling and passing around cameras, for example when you pass the cameras over to another person you should say ‘yours’ and ‘mine’, so it is clear who has control and who is responsible for not dropping it.
On Set: In the filming industry terminology like ‘Standby’ is used by the director before starting to film to ensure that every one is ready. If they are, they reply with ‘Standing by’, this clear communication ensures that filming can be as efficient as possible.
When the director shouts ‘rolling’ it is a command for everyone on set to be quiet until they shout ‘action’, which signifies for the actors to begin. The last ‘cut’ signifies the end of the shoot and ‘strike the kit’ means the film crew should pack away, put camera batteries on charge and ensure the footage is uploaded.
180 Degree rule: A cinematography guideline that states two characters in a scene should maintain the same left/right relationship to one another. When the camera passed over the invisible axis that connects the two subjects, it is referred to as crossing the line and the shot becomes a reverse angle.
White Balance (WB): The process of removing unrealistic colour casts, so that objects which appear white in person are rendered white in the photo. Proper camera white balance has to consider the "colour temperature" of a light source, which refers to the warmth or coolness of white light.
To adjust the white balance, select ‘WB’ on the camera, so that little pictures representing
difference colour tones that are used in different lights which come up. This will give a more realistic effect.
Good practice in editing: We are using Final Cut Pro and iMovie on the iMacs in the media studio. When uploading our footage, we should create folders called ‘bins’ to put the shots, unedited footage from cameras are called ‘rushes’.


Preliminary Exercises - Photo Angles
 |
| CANTED ANGLE - tilted view of the subject - often used in mystery and suspense films -creates sense of unease/disorder |
 |
| BIRDS EYE VIEW - view from directly above subject - a view of the whole scene - detached view of action |
 |
| OVER THE SHOULDER SHOT - replicates eye line of the subject - insight into characters view |
 |
| WORMS EYE VIEW - shot taken from below subject, looking up - subject holds a sense of authority/importance |
 |
| CLOSE UP - distinguishes subject from its context/background -focuses attention on finer details (e.g emotions, reactions) |
 |
| EXTREME CLOSE-UP - used to show even finer detail (e.g eyes) |
 |
| LONG-SHOT - shows majority/all of subject as well as much of surroundings |
 |
| EXTREME LONG-SHOT - camera is at its furthest from subject - allows a wider view of the setting |
 |
| HIGH ANGLE - camera looks down upon the subject -viewer maintains a sense of superiority over the subject - sense of detachment from the scene |
 |
| LOW ANGLE - camera shot taken from beneath subject - emphasises subjects importance |
 |
| MID-SHOT -subject and setting occupy roughly equal areas of frame |

PHOTOGRAPHY: at the start of the course, you learned about camera angles and shot types. Good work.
ReplyDeleteON THE SET: Well presented account of useful practical work.
ReplyDeleteCONTINUITY EXERCISE: Excellent work showing clear engagement.
ReplyDeleteTABLE TOP FILM OPENING: Excellent: you and your production team have worked very effectively to film and edit your practice film opening 'L'Amour Perdu' and have completed the task with credits, titles, sound and live action. Well done!
ReplyDelete